
Cluster(叢集)的應用主要有四種,叢集儲存(Storage Cluster)、HA(High Available高可用)、Load Balance與High Performance等,每一種都可以適用於不同的需求。
這篇文章筆者想測試並介紹關於Storage Cluster的應用。目前這個Gluster很熱門的使用再雲端架構的底層,而雲端這個爭議的名詞不在筆者此文章的討論範圍,講了雲端的應用會有不同的派別支持者提出不同的堅持,這並非筆者想要得到的結果。所以底下筆者就一般企業可以用來做最基本的應用而撰寫,這也是筆者在業界所見,提出很基礎卻能大幅提昇企業效能的應用。
一般企業常用到File Server,通常都隨便買了一部Server,就用其本機磁碟做出分享,然後在一段時間過了之後,發現空間不夠了、硬碟老舊了,然後就找SI估價,用疊床架屋的方式把Storage的空間再加大(比如串Nas或其他Box,)......,最後整個硬體架構亂七八糟,不僅效能差且機房也亂。
在企業應用裡,File Server扮演了部門存放資料的儲存池,提供同部門的員工共同維護與使用所需要的資料,這樣的主機在十年前,或許一個部門給個50G就很足夠。隨著時代的演進,不僅資料量越來越多,單一檔案也相對越來越大,若仍以五年前、十年前的配備與規格來提供服務(或許三年好了),絕對不敷所需。堅持購買單一儲存體的情況只是讓IT隨時都要想辦法在空間不足的情況下,再採購新設備、資料搬移。
管理學中,企業資源的浪費,不僅是與公司財務帳面有關的浪費才是浪費,人員重複做相同的事情更是一項影響產能的重要因素。今天我們買了10TB的NAS,我們期望它可以撐多久呢?若產線相關部門的空間需求,瞬間將10TB的NAS使用殆盡,且需要更大的磁碟空間,迫在眉梢,IT來得及評估或來得及找廠商來做產品簡報嗎(廠商光要推新產品給你就花了多少時間了)?
當確定之後,又怎麼有辦法知道何時這些空間將在何時發生短缺的情況?買了新的設備,路徑又要重新設定,或是層層的掛載(如NFS或CIFS),Server與Server彼此間關係複雜,牽一髪動全身,如此效能又怎麼會好呢?
這時高度的「可擴充性」就是如此情況的選擇。我們建構一套可隨時擴充的儲存體,資料可以進行同步,且在硬體故障時可將獨立的Storage Server停機進行維修,更重要的是,這樣的Storage Server便宜又容量大,且共同運作、效能高,這不是很適合企業使用嗎?
建置SAN的環境是有錢的公司在做的事情,當然也有低階的SAN,但是儲存體的效能在硬碟數量太少的情況下是非常低落的。除了SAN以外不代表就沒有其他選擇。這篇文章筆者要建構四個Storage Node,彼此擁有共同的FileSystem,並且測試資料存放時,將其中一部Storage Node關閉測試是否資料有遺失的情況;並且測試增加新Storage Node之後,整體FileSystem的空間增長。這邊無法進行效能測試,因為筆者的環境是虛擬主機,硬碟數目不夠的話無法測試效能。(單一硬碟,同時多session讀寫會讓效能很差。)
建置SAN的環境是有錢的公司在做的事情,當然也有低階的SAN,但是儲存體的效能在硬碟數量太少的情況下是非常低落的。除了SAN以外不代表就沒有其他選擇。這篇文章筆者要建構四個Storage Node,彼此擁有共同的FileSystem,並且測試資料存放時,將其中一部Storage Node關閉測試是否資料有遺失的情況;並且測試增加新Storage Node之後,整體FileSystem的空間增長。這邊無法進行效能測試,因為筆者的環境是虛擬主機,硬碟數目不夠的話無法測試效能。(單一硬碟,同時多session讀寫會讓效能很差。)
這邊筆者要使用CentOS 6.3來進行實測。
下方表格是筆者這次的環境配置:
Cluster Testing
| ||||
IP Address
|
OS
|
Disk Space for Gluster
|
Role
| |
Gluster1
|
192.168.1.101
|
CentOS 6.3
|
10GB
|
Server
|
Gluster2
|
192.168.1.102
|
CentOS 6.3
|
10GB
|
Server
|
Gluster3
|
192.168.1.103
|
CentOS 6.3
|
10GB
|
Server
|
Gluster4
|
192.168.1.104
|
CentOS 6.3
|
10GB
|
Server
|
GlusterClient
|
192.168.1.105
|
CentOS 6.3
|
none
|
Client
|
Gluster可以將多部主機串起,共同運作,然後實現上述的四種應用。我們的環境,要將所有的Node(節點,視為電腦即可,先不管特例)置於同一個網路環境中,所以歸納此次實測的重點,總共有三大部份:
1. 環境設定,要符合Gluster特性與基本要求
a. 所有Node的連結
b. 網路設定(先關閉iptables, 並disable SELinux,最後再將iptables加入規則)
c. 儲存體
2. 套件安裝
Glusterfs套件安裝
3. 測試
一、 安裝
從第一個Node, Gluster1開始。
筆者是參考官方網站的設定法,所以這邊也直接使用官方文件使用的xfs格式來做FileSystem.
[root@Gluster1 ~]# yum search mkfs.xfs # 先找找看有什麼套件是XFS Filesystem相關的。
Loaded plugins: fastestmirror
Loading mirror speeds from cached hostfile
* base: centos.mirror.cdnetworks.com
* extras: centos.mirror.cdnetworks.com
* updates: centos.mirror.cdnetworks.com
============================== Matched: mkfs.xfs ===============================
xfsprogs.i686 : Utilities for managing the XFS filesystem
xfsprogs.x86_64 : Utilities for managing the XFS filesystem # 我們要的就是這個套件
[root@Gluster1 ~]# yum install xfsprogs #將套件安裝起來
Gluster官方建議使用這個FileSystem,應該是取其對於大檔案的處理流暢與訊息傳遞快速的特性,細節還要在研究才明白。
二、格式化磁碟並掛載
[root@Gluster1 ~]# mkfs.xfs -i size=512 /dev/vdb #筆者所附加的10G硬碟,代號為/dev/vdb,將其格式化為XFS格式
[root@Gluster1 ~]# mkdir -p /GlusterFS/brick1 # 建立即將要用來掛載/dev/vdb的路徑
[root@Gluster1 ~]# vi /etc/fstab #編輯/etc/fstab然後將下面這行加在檔案最後。
/dev/vdb /GlusterFS/brick1 xfs defaults 1 2
[root@Gluster1 ~]# mount -a && mount
/dev/mapper/vg_gluster1-lv_root on / type ext4 (rw)
proc on /proc type proc (rw)
sysfs on /sys type sysfs (rw)
devpts on /dev/pts type devpts (rw,gid=5,mode=620)
tmpfs on /dev/shm type tmpfs (rw,rootcontext="system_u:object_r:tmpfs_t:s0")
/dev/vda1 on /boot type ext4 (rw)
none on /proc/sys/fs/binfmt_misc type binfmt_misc (rw)
/dev/vdb on /GlusterFS/brick1 type xfs (rw)
[root@Gluster1 ~]#
/dev/vdb on /GlusterFS/brick1 type xfs (rw) #已經掛載上了
[root@Gluster1 ~]# yum search gluster* #尋找gluster相關套件
Loaded plugins: fastestmirror
Loading mirror speeds from cached hostfile
* base: centos.mirror.cdnetworks.com
* extras: centos.mirror.cdnetworks.com
* updates: centos.mirror.cdnetworks.com
Warning: No matches found for: gluster*
Loaded plugins: fastestmirror
Loading mirror speeds from cached hostfile
* base: centos.mirror.cdnetworks.com
* extras: centos.mirror.cdnetworks.com
* updates: centos.mirror.cdnetworks.com
Warning: No matches found for: gluster*
No Matches found#系統說找沒有,所以我們照官方的做法將gluster的source加入repository之中。
[root@Gluster1 ~]# wget -P /etc/yum.repos.d http://download.gluster.org/pub/gluster/glusterfs/LATEST/EPEL.repo/glusterfs-epel.repo
[root@Gluster1 ~]# ls /etc/yum.repos.d/
CentOS-Base.repo CentOS-Media.repo glusterfs-epel.repo
CentOS-Debuginfo.repo CentOS-Vault.repo
[root@Gluster1 ~]#
#多了一個glusterfs專用的repo檔了。
[root@Gluster1 ~]# yum install glusterfs-{,fuse,server} #官方文件少加了一個"-"符號,照做會無法下載哦!
#上面這個指令,讓系統安裝了如下三個套件,這是用於組成Gluster Storage的每個Node都必需要安裝的套件。做完Gluster1之後,我們其餘的Node都要照著做一次。
glusterfs-fuse x86_64 3.3.1-1.el6 glusterfs-epel 64 k
glusterfs-server x86_64 3.3.1-1.el6 glusterfs-epel 540 k
glusterfs x86_64 3.3.1-1.el6 glusterfs-epel 1.8 M
[root@Gluster1 ~]# service glusterd start
Starting glusterd: [ OK ]
[root@Gluster1 ~]# service glusterd status
glusterd (pid 1368) is running...
[root@Gluster1 ~]#
Starting glusterd: [ OK ]
[root@Gluster1 ~]# service glusterd status
glusterd (pid 1368) is running...
[root@Gluster1 ~]#
這邊我們需要做個動作,因為CentOS是Enterprise導向的作業系統,預設的設定比較嚴謹要一一手動調整。
a. 關閉防火牆
[root@Gluster1 ~]# /etc/init.d/iptables stop
iptables:正在清除防火牆規則: [ 確定 ]
iptables:正在設定 chains 為 ACCEPT 政策:filter [ 確定 ]
iptables:正在卸載模組: [ 確定 ]
[root@Gluster1 ~]#
iptables:正在清除防火牆規則: [ 確定 ]
iptables:正在設定 chains 為 ACCEPT 政策:filter [ 確定 ]
iptables:正在卸載模組: [ 確定 ]
[root@Gluster1 ~]#
b. disable SELinux
[root@Gluster1 ~]# vi /etc/sysconfig/selinux
# This file controls the state of SELinux on the system.
# SELINUX= can take one of these three values:
# enforcing - SELinux security policy is enforced.
# permissive - SELinux prints warnings instead of enforcing.
# disabled - No SELinux policy is loaded.
SELINUX=disabled #從enforcing更改為disabled
# SELINUXTYPE= can take one of these two values:
# targeted - Targeted processes are protected,
# mls - Multi Level Security protection.
SELINUXTYPE=targeted
[root@Gluster1 ~]# setenforce 0 # 手動設定SELinux為Permissive,下次重開機會因為已經更改過設定檔而disabled.
[root@Gluster1 ~]# getenforce
Permissive
[root@Gluster1 ~]#
c. 將gluster相關的服務設定開機啟動
若沒有設定,萬一主機壞了維修,關機再開機的時候,會發現node一直都沒回到cluster的成員中,會有confused的狀況。
[root@Gluster1 ~]# chkconfig
glusterd 0:關閉 1:關閉 2:關閉 3:關閉 4:關閉 5:關閉 6:關閉
glusterfsd 0:關閉 1:關閉 2:關閉 3:關閉 4:關閉 5:關閉 6:關閉
[root@Gluster1 ~]# chkconfig glusterd on
[root@Gluster1 ~]# chkconfig glusterfsd on
glusterd 0:關閉 1:關閉 2:關閉 3:關閉 4:關閉 5:關閉 6:關閉
glusterfsd 0:關閉 1:關閉 2:關閉 3:關閉 4:關閉 5:關閉 6:關閉
[root@Gluster1 ~]# chkconfig glusterd on
[root@Gluster1 ~]# chkconfig glusterfsd on
到這邊為止,我們已經將第一個Node(Gluster1)設定完畢
接著將Gluster1的所有設定,一一的在Gluster2, Gluster3以及Gluster4設定完畢。
這時,四部主機都掛載10G的XFS File System /etc/vdb在/GlusterFS/brick1。
注意:若偷懶使用VM Clone的方式,記得不要先安裝Gluster套件,因為Gluster會產出一個UUID代表每一個Node。若在安裝Gluster之後才做Clone,Gluster就會發現每個Node都具有同一個UUID而導致錯誤的產生。
接著我們要將四部主機的XFS串連起來。
三、串連FileSystem
先在每部主機的/etc/hosts加入IP對應,對應如下:
[root@Gluster2 ~]# vi /etc/hosts
192.168.1.101 Gluster1
192.168.1.102 Gluster2
192.168.1.103 Gluster3
192.168.1.104 Gluster4
#上面的對應加在檔案最後就可以了。
[root@Gluster1 ~]# gluster peer probe Gluster2
Probe successful
[root@Gluster1 ~]# gluster peer probe Gluster3
Probe successful
[root@Gluster1 ~]# gluster peer probe Gluster4
Probe successful
[root@Gluster1 ~]# 現在Gluster2, Gluster3, Gluster4都已經被納入整個Cluster的成員了。
Probe successful
[root@Gluster1 ~]# gluster peer probe Gluster3
Probe successful
[root@Gluster1 ~]# gluster peer probe Gluster4
Probe successful
[root@Gluster1 ~]# 現在Gluster2, Gluster3, Gluster4都已經被納入整個Cluster的成員了。
將4個Nodes的File System 串起。
[root@Gluster1 ~]# gluster volume create GlusterFS replica 2 Gluster1:/GlusterFS/brick1/ Gluster2:/GlusterFS/brick1/ Gluster3:/GlusterFS/brick1/ Gluster4:/GlusterFS/brick1/
Creation of volume GlusterFS has been successful. Please start the volume to access data.
[root@Gluster1 ~]# 成功了!
上方有一個參數"replica",是可以讓我們決定這個Storage Cluster是以鏡像(一模一樣複製另一份)來做,如此可確保資料的可靠度。也有stripe的方式可以供我們設定成類似Raid 0一樣的串法。
Creation of volume GlusterFS has been successful. Please start the volume to access data.
[root@Gluster1 ~]# 成功了!
上方有一個參數"replica",是可以讓我們決定這個Storage Cluster是以鏡像(一模一樣複製另一份)來做,如此可確保資料的可靠度。也有stripe的方式可以供我們設定成類似Raid 0一樣的串法。
[root@Gluster1 ~]# gluster volume start GlusterFS
Starting volume GlusterFS has been successful
[root@Gluster1 ~]# 啟動Volume就可以開始使用這個大空間了!
[root@Gluster1 ~]# gluster volume info #show一下File system的資訊
Volume Name: GlusterFS
Type: Distributed-Replicate
Volume ID: 23e71c1c-1cfa-4729-b2b6-d9c27df03e52
Status: Started
Number of Bricks: 2 x 2 = 4
Transport-type: tcp
Bricks:
Brick1: Gluster1:/GlusterFS/brick1
Brick2: Gluster2:/GlusterFS/brick1
Brick3: Gluster3:/GlusterFS/brick1
Brick4: Gluster4:/GlusterFS/brick1
[root@Gluster1 ~]# 現在我們切換到Client Node,來試試mount global file system。
Client端並未安裝GlusterFs的Client端套件,所以必須要先事先安裝才能使用。
[root@GlusterClient ~]# wget -P /etc/yum.repos.d http://download.gluster.org/pub/gluster/glusterfs/LATEST/EPEL.repo/glusterfs-epel.repo #一樣,把Gluster的source加到自己的主機上。
[root@GlusterClient ~]# wget -P /etc/yum.repos.d http://download.gluster.org/pub/gluster/glusterfs/LATEST/EPEL.repo/glusterfs-epel.repo #一樣,把Gluster的source加到自己的主機上。
[root@GlusterClient ~]# yum install glusterfs #安裝gluster file system套件
[root@GlusterClient ~]# yum install glusterfs-fuse #安裝Gluster User Space套件才能讓系統辨識glusterfs這種type的 File System.
[root@GlusterClient ~]# mount -t glusterfs Gluster1:/GlusterFS /GlusterFS/#此處掛載的對象,是我們在Storage Node上Create的Volume Name,筆者這次取名取得不好,若有混淆或不懂的地方,在麻煩留言跟筆者說下,我會協助您找出問題。
[root@GlusterClient ~]# df -h
檔案系統 Size Used Avail Use% 掛載點
/dev/mapper/vg_glusterclient-lv_root 5.5G 830M 4.4G 16% /
tmpfs 499M 0 499M 0% /dev/shm
/dev/vda1 485M 52M 408M 12% /boot
Gluster1:/GlusterFS 20G 65M 20G 1% /GlusterFS
[root@GlusterClient ~]#
檔案系統 Size Used Avail Use% 掛載點
/dev/mapper/vg_glusterclient-lv_root 5.5G 830M 4.4G 16% /
tmpfs 499M 0 499M 0% /dev/shm
/dev/vda1 485M 52M 408M 12% /boot
Gluster1:/GlusterFS 20G 65M 20G 1% /GlusterFS
[root@GlusterClient ~]#
#這邊可以看到在/GlusterFS這個路徑已經將我們的Gluster FileSystem 掛載上去了。
那為什麼只有20G呢?不是已經建立了4個Node,並且都各有10G的空間?
那是因為我們做的是"replica 2",也就是將4個Node做成2個鏡像File System。
那是因為我們做的是"replica 2",也就是將4個Node做成2個鏡像File System。
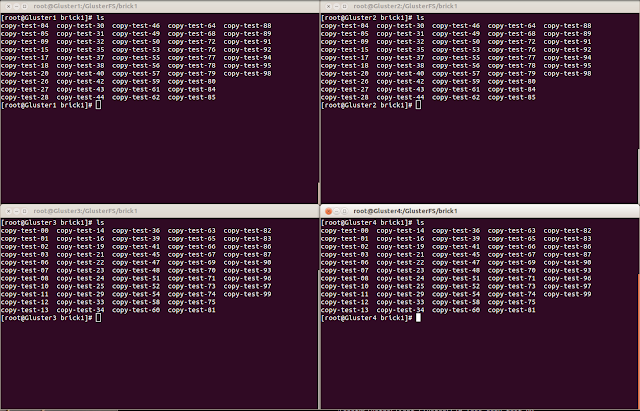
照官方文件的作法,Create 100個檔案測試看看
[root@GlusterClient GlusterFS]# for i in `seq -w 0 99`; do cp -rp /var/log/messages* /GlusterFS/copy-test-$i; done
下圖可以看出,所有Storage Node都有一模一樣的資料了。
我們再來測試,將Gluster2直接關閉

關閉之後,再查一次資料是否正常運作。

資料還在!所以證明這個Cluster再一個Node毀損的時候,還是可以繼續進行的。
光測試這樣還不足以證明他的功能性,筆者想再開一個主題來摧殘這個file system。
有了這套系統之後,可以自由的新增Storage,還能在系統故障時進行停機維修,而且買Storage就可以將成本降到很低。簡單而容易維護的系統,何不在公司用用看呢!
沒有留言:
張貼留言
艾倫搜尋企業級的Open Source Solutions,提供簡易好上手的教學文件。